Installing on Jetstream2#
Goal#
By the end of this tutorial, you should have a JupyterHub with some admin users and a user environment with packages you want installed running on Jetstream2.
Prerequisites#
An ACCESS ID, and membership in an allocation with access to Jetstream2 resources; for more information, see the Jetstream2 Allocations Overview page and the Get started with Jetstream2 guide.
Step 1: Launch a Jetstream2 instance#
We’ll create a new Jetstream2 instance:
Log in to the Jetstream2 portal. You must have (and select) an allocation in order to launch instances. Click the allocation you want to charge.
Click Create ➜ Instance.
From the list of images, select Ubuntu 24.04 (Ubuntu 22.04/Jammy or newer is supported).
In the Create Instance dialog:
Set a descriptive Instance Name (this is used in the default hostname and helps users recognize it).
Choose an Instance Size. We suggest
m3.small(2 vCPUs / 6 GiB RAM) or larger for more than a couple of users. The absolute minimum TLJH can start with is about 1 GiB RAM, but you’ll quickly run out with real workloads.See the resource estimation guide: Choosing resources for help picking CPU, RAM, and disk.
(Optional) Increase the Volume Size if you expect many users or large datasets. You can not easily shrink later.
Launch the instance (click Create button at the bottom of the form).
Step 2: Install The Littlest JupyterHub#
Wait a few minutes for the instance to show the status “Ready”
Copy the Hostname under Credentials. It will look like
yourinstancename.<allocation-id>.projects.jetstream-cloud.org. Keep it handy, we will use it multiple times in the next steps.SSH into the instance with the
exouseruser:ssh exouser@yourinstancename.<allocation-id>.projects.jetstream-cloud.orgNeed the passphrase? In Exosphere, open Instances, select your JupyterHub instance, and expand Credentials. Click Show Passphrase next to the
exouserentry to reveal or copy it before running thesshcommand.Run the TLJH bootstrap script. Replace
<admin-user-name>with the Linux username you want to use for the first JupyterHub admin account (for example, your GitHub username). Do not include<or>in the command. This user will be able to log in after setup and administer the hub.curl -L https://tljh.jupyter.org/bootstrap.py | sudo -E python3 - --admin <admin-user-name>
Optional quick sanity check:
sudo systemctl is-active jupyterhub traefik
Open the Hostname in a web browser (http on port 80). You should see the JupyterHub login page (typically titled
JupyterHubwith aSign inbutton). Your browser will warn about the site not being secure (no HTTPS)—we’ll enable HTTPS in the next step. Do not log in yet; first set up HTTPS, so we avoid transmitting the password in clear text.
Step 3: Enable HTTPS#
Encrypted (HTTPS) access is strongly recommended before inviting users.
See the full guide: Enable HTTPS. Below is a quick recipe for using the default Jetstream-provided hostname.
In the terminal inside the instance, configure Let’s Encrypt (replace with a real email you control, and the correct hostname):
sudo tljh-config set https.enabled true
sudo tljh-config set https.letsencrypt.email you@example.com
sudo tljh-config add-item https.letsencrypt.domains yourinstancename.<allocation-id>.projects.jetstream-cloud.org
sudo tljh-config show
sudo tljh-config reload proxy
Confirm
https.letsencrypt.domainsappears insudo tljh-config showoutput before continuing.Wait ~30–60 seconds, then reload the site using https://.
Quick terminal checks (faster than refreshing the browser repeatedly):
sudo ss -ltnp | grep -E ':80|:443'
curl -Ik https://yourinstancename.<allocation-id>.projects.jetstream-cloud.org
The
curl -Ikcheck can return200,302, or405, and all of these indicate the HTTPS endpoint is reachable.If certificate issuance fails, check the logs:
sudo journalctl -u traefik --since "15 minutes ago" | grep -iE "acme|error|443|certificate|challenge"
Tips:
Make sure ports 80 and 443 are open in your Jetstream security group (they are open by default for new projects; adjust only if you customized network policies).
If you later attach a custom domain, add it with another
add-itemcommand and reload the proxy again.If
https.letsencrypt.domainsis missing fromsudo tljh-config show, run theadd-itemcommand again, verify it appears, then reload the proxy.
Step 4: Log in as the administrative user and set a password#
Now log in with the
<admin-user-name>athttps://yourinstancename.<allocation-id>.projects.jetstream-cloud.org. Since this is the first login, you’ll be prompted to set a password. Choose a strong password and store it safely. This password is now the credential for that admin user.Congratulations, you have a running JupyterHub!
Step 5: Adding more users#
Most administration & configuration of the JupyterHub can be done from the web UI directly. Let’s add a few users who can log in!
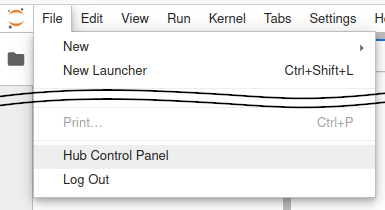
In the File menu select the entry for the Hub Control Panel.
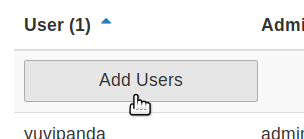
In the control panel, open the Admin link in the top left.

This opens up the JupyterHub admin page, where you can add / delete users, start / stop peoples’ servers and see who is online.
Click the Add Users button.
A Add Users dialog box opens up.
Type the names of users you want to add to this JupyterHub in the dialog box, one per line.
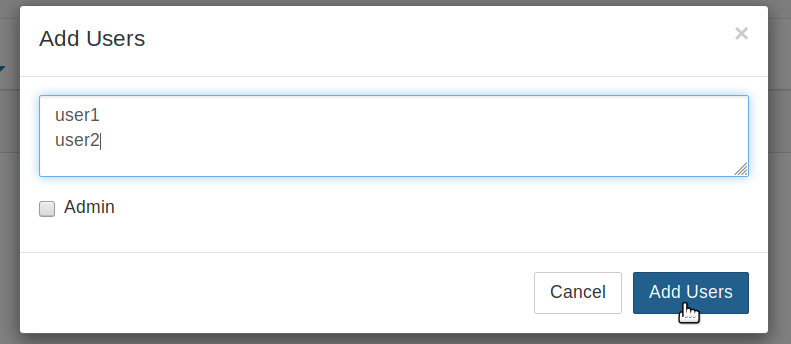
You can tick the Admin checkbox if you want to give admin rights to all these users too.
Click the Add Users button in the dialog box. Your users are now added to the JupyterHub! When they log in for the first time, they can set their password - and use it to log in again in the future.
Congratulations, you now have a multi user JupyterHub that you can add arbitrary users to!
Next common tasks:
Browse the full How-To index for more.
Ask for help#
Need a hand?
For Jetstream2 specific questions (allocations, quotas, instance lifecycle, networking, etc.), use the Jetstream support resources.
For The Littlest JupyterHub usage, configuration, or upgrade questions, search or post in the Jupyter forum TLJH category.
If you believe you have found a TLJH bug or have a clear documentation improvement, open an issue (or pull request if you have a proposed fix) in the TLJH GitHub repository.
When asking for help about TLJH, it is often useful to provide:
A short description of what you were trying to do and what happened instead
Relevant log excerpts (see Looking at Logs)
Your TLJH version (
sudo tljh-config show | grep versionif present in config) and the output oflsb_release -afor the OSAny custom installer flags or
tljh-configchanges you have applied
This information helps others debug and answer more quickly.