Install conda, pip or apt packages#
TLJH (The Littlest JupyterHub) starts
all users in the same conda environment.
Packages / libraries installed in this environment are available to all
users on the JupyterHub. Users with admin rights
can install packages easily.
Installing pip packages#
pip is the recommended tool for installing packages in Python from the Python Packaging Index (PyPI). PyPI has almost 145,000 packages in it right now, so a lot of what you need is going to be there!
Log in as an admin user and open a Terminal in your Jupyter Notebook.
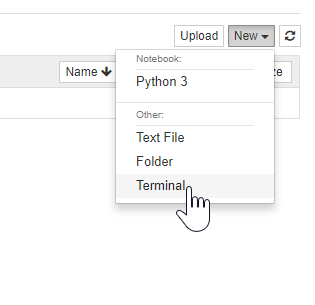
If you already have a terminal open as an admin user, that should work too!
Install a package!
sudo -E pip install numpy
This installs the
numpylibrary from PyPI and makes it available to all users.Note
If you get an error message like
sudo: pip: command not found, make sure you are not missing the-Eparameter aftersudo.
Installing conda packages#
Conda lets you install new languages (such as new versions of python, node, R, etc) as well as packages in those languages. For lots of scientific software, installing with conda is often simpler & easier than installing with pip - especially if it links to C / Fortran code.
We recommend installing packages from conda-forge, a community maintained repository of conda packages.
Log in as an admin user and open a Terminal in your Jupyter Notebook.
If you already have a terminal open as an admin user, that should work too!
Install a package!
sudo -E conda install -c conda-forge gdal
This installs the
gdallibrary fromconda-forgeand makes it available to all users.gdalis much harder to install with pip.Note
If you get an error message like
sudo: conda: command not found, make sure you are not missing the-Eparameter aftersudo.
Installing apt packages#
apt is the
official package manager for the Ubuntu Linux
distribution. You can install utilities (such
as vim, sl, htop, etc), servers (postgres, mysql, nginx,
etc) and a lot more languages than present in conda (haskell,
prolog, INTERCAL). Some third party software (such as
RStudio) is
distributed as .deb files, which are the files apt uses to install
software.
You can search for packages with Ubuntu Package search - make sure to look in the version of Ubuntu you are using!
Log in as an admin user and open a Terminal in your Jupyter Notebook.
If you already have a terminal open as an admin user, that should work too!
Update list of packages available. This makes sure you get the latest version of the packages possible from the repositories.
sudo apt update
Install the packages you want.
sudo apt install mysql-server git
This installs (and starts) a MySQL database server and
git.
User environment location#
The user environment is a conda environment set up in /opt/tljh/user,
with a python3 kernel as the default. It is readable by all users, but
writeable only by users who have root access. This makes it possible for
JupyterHub admins (who have root access with sudo) to install software
in the user environment easily.
Accessing user environment outside JupyterHub#
We add /opt/tljh/user/bin to the $PATH environment variable for all
JupyterHub users, so everything installed in the user environment is
available to them automatically. If you are using ssh to access your
server instead, you can get access to the same environment with:
export PATH=/opt/tljh/user/bin:${PATH}
Whenever you run any command now, the user environment will be searched
first before your system environment is. So if you run
python3 <somefile>, it’ll use the python3 installed in the user
environment (/opt/tljh/user/bin/python3) rather than the python3
installed in your system environment (/usr/bin/python3). This is
usually what you want!
To make this change ‘stick’, you can add the line to the end of the
.bashrc file in your home directory.
When using sudo, the $PATH environment variable is usually reset, for
security reasons. This leads to error messages like:
sudo conda install -c conda-forge gdal
sudo: conda: command not found
The most common & portable way to fix this when using ssh is:
sudo PATH=${PATH} conda install -c conda-forge gdal
Upgrade to a newer Python version#
All new TLJH installs use miniconda 4.7.10, which comes with a Python 3.7 environment for the users. The previously TLJH installs came with miniconda 4.5.4, which meant a Python 3.6 environment.
To upgrade the Python version of the user environment, one can:
Start fresh on a machine that doesn’t have TLJH already installed.
See the Installing section about how to install TLJH.
Upgrade Python manually.
Because upgrading Python for existing installs can break packages already installed under the old Python, upgrading your current TLJH installation, will NOT upgrade the Python version of the user environment, but you may do so manually.
Steps:
Activate the user environment, if using ssh. If the terminal was started with JupyterHub, this step can be skipped:
source /opt/tljh/user/bin/activate
Get the list of currently installed pip packages (so you can later install them under the new Python):
pip freeze > pip_pkgs.txt
Update all conda installed packages in the environment:
sudo PATH=${PATH} conda update --all
Update Python version:
sudo PATH=${PATH} conda install python=3.7
Install the pip packages previously saved:
pip install -r pip_pkgs.txt